Getting the Most From OpenTX
With Your Multirotor
Your Guide: Lee Schofield (Painless360)
For a PDF copy of this lesson, click HERE.
Introduction
Multirotors are fast becoming one of the most popular models for new builder and pilots to fly.
They are available in all sorts of sizes and shapes, pre-built or made from individual components, small indoor models that fit on the palm of your hand to large complex carbon fibre spiders that suspend expensive camera equipment to take breath-taking pictures and video.
In this overview document we cover the basics on how you can use the OpenTX system with your model to get the most from your new multirotor.
This document is written for those RC pilots that have a basic knowledge of RC power and controls but may be new to the idea of a multirotor and are about to build their first model.
If you would like some help on the steps to learn to fly a multirotor you can watch: RC Basics – Learning to Fly a Multirotor. (http://bit.ly/1KYBfNK)
What Is a Multirotor
In its most simple form a multirotor is a model that uses more than one propeller to fly – think of the Chinook helicopter as an early example. Modern multirotors can have 2 to 16 motors and different motor layouts. More motors equals more lifting power, less motors equals less cost and complexity. The most popular choice is the quadcopters with 4 motors.
The benefit of the 4 motor quadcopter is that it is very simple to build, all the arms are identical, and it doesn’t use any servos to fly the craft but uses the rotation/counter-rotation of the blades to turn.
Multi rotors are much more stable than traditional helicopters as they all use some form of flight controller to maintain the attitude of the craft and correct any errors or drift automatically. The flight controller is constantly flying the multirotor and listens to the commands from your radio.
There are many types of flight controllers available on the market and each has its own strengths and weaknesses, supporters and detractors. The open source community has produced some fantastic products that now allow hobbyists to build everything from simple acrobatic multirotor to ones that are capable of full autonomous flight and GPS navigation.
Different Flight Controllers
The cost of building your own multirotor has dropped dramatically in recent years. Flight controllers that used to cost hundreds of dollars are now available for a fraction of the cost. New features and enhancements to both the hardware and software/firmware mean that everything is improving all the time.
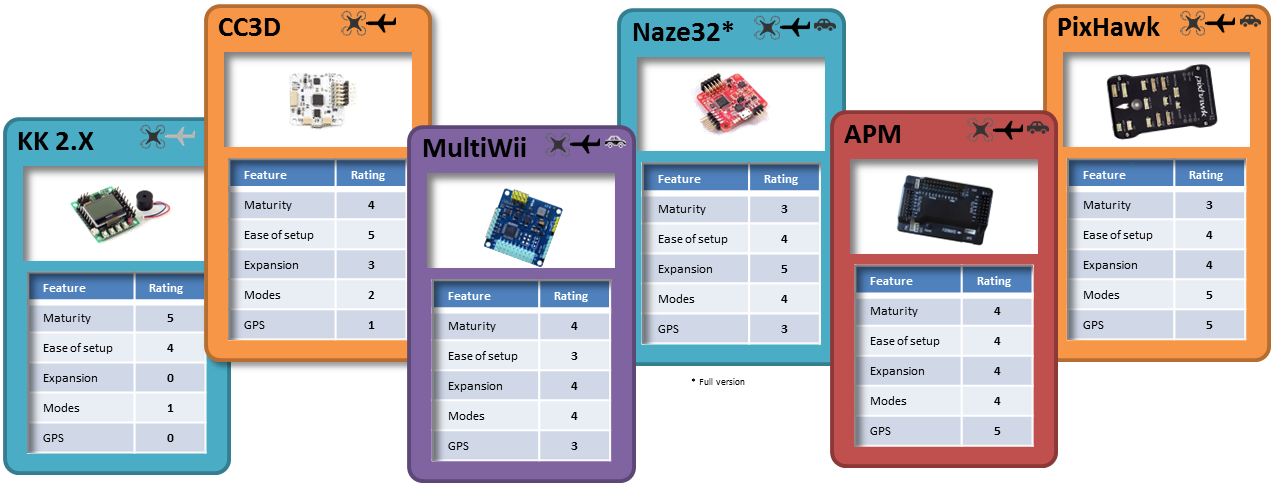
A paper detailing the differences for the common flight controllers would take many pages and is outside the scope of this introduction so below is a set of trading cards that help explain the differences between them.
Key:
‘Maturity’ is how long the flight controller (FC) has been available, ‘Ease of Setup’ refers to how easy it is to setup and program, ‘Expansion’ refers to how easily you can add peripherals (like Bluetooth, GPS, On Screen Displays, LEDs and such to the FC), ‘Modes’ refers to how many flight modes it supports (auto-level, GPS hold, Circle, GPS Return to Home for example).’ GPS’ refers to how sophisticated the GPS modes are, does it only allow for a GPS Hold and GPS RTH mode or can it use the GPS to fly autonomous missions.
Other flight controllers, and versions of those shown above, are available. Be aware that some boards can also run different versions of the software/firmware that will make it fly and behave differently. It is very much down to what you want to do with your model and how you like to fly.
To see more about flight controller visit: Which Flight Controller? (http://bit.ly/1dskY5e)
Using Your OpenTX Radio
With Your New Multirotor
Almost all flight controllers need 5 channels to fly. The standard four controls are the same as other model – Elevator, Throttle, Aileron and Rudder as well as another to tell the flight controller how you want it to fly the model. You can set the modes for the switch position for the fifth channel to apply different amounts of auto-level and behaviour. Common practices like using exponential to calm the centre of the controls is still a great idea and can also be set in the software on the flight controller.
By using the advanced features of your OpenTX radio you can enhance the flying experience and get the model to fly smoother and more safely. The following is a list of common considerations when setting up your model on the radio.
Channel Setup
To use the OpenTX system with the flight controller on your model then the simplest setup is a standard 5 output model as described above. Putting the fifth channel on a three position switch will give you up to three options for the ‘mode’ that the flight controller can use.
Some flight controllers (PixHawk and APM) will allow up to 6 flight modes to be selected from the radio so a mix to allow for 6 positions from two switches can be useful. Additional auxiliary channels can be added for the more complex flight controllers as they support mode and setup selection from a number of ‘mode’ channels as well as allow the use of gimbals to stabilise cameras.
It can be useful to also have extra channels setup on switches for the more advanced features of your flight controller. Many are now using ‘auto tune’ functions that can be activated in flight to automatically test and setup the PID settings needed for great flying. It could also control a camera gimbal or LED lights attached to the model.
All but the earliest flight controllers support PPM so a single cable is enough to connect your receiver to the flight controller, greatly simplifying the wiring. Many of the newer boards also support S-BUS but may need an inverter cable to understand the inverted S-BUS signals.
Controls
All modern flight controllers employ some form of safety feature that will not arm the motors until a specific sequence is seen from the radio. Commonly this is throttle low, full right rudder to arm, throttle low, full left rudder to disarm. This can also be setup on many flight controllers as a switch too.
You need to make sure that the rudder is not reversed and the endpoints of the rudder and throttle channels are enough so the flight controller ‘sees’ this position and takes the appropriate action.
 Once built, test fly the model and see how much throttle you need to hover. Once you know that throttle position, create a curve and apply it to the throttle channel to flatten out the throttle response around that hovering point to make the model much easier to fly and hover smoothly.
Setting up a mode switch is essential too. Many pilots setup a mode with light stabilisation for acrobatic flying and fast forward flight, a second mode with strong auto level (sometimes called Horizon, Stabilize or Auto-Level mode) for slower flight with cameras and a GPS Return to Home (RTH) mode in case of loss of orientation to bring the craft safely back to the point of take-off.
Setting Flight Modes
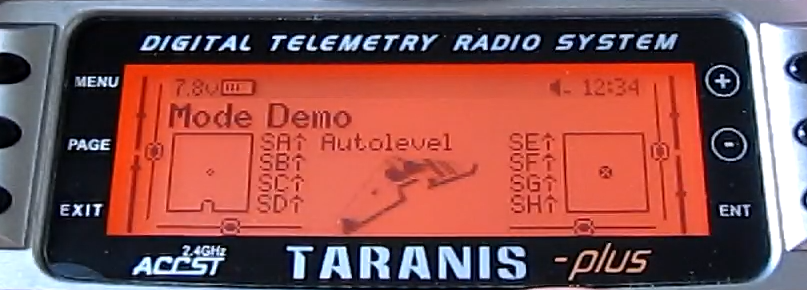
Using flight modes on the radio and assigning them to the same switch used to change the flight controller mode can be very useful.
Displaying the flight mode that you have selected on the screen of the radio is a great reminder of what mode you are in and avoids confusion. This may seem like overkill but remembering which switch position is ‘Autolevel’ and which one is ‘GPS Hold’ mode can become tricky when you start to get more than one model.
You can see them in action by visiting: Taranis Plus Radio: Flight Modes and Global Variables (http://bit.ly/1F6972T)
Using Telemetry
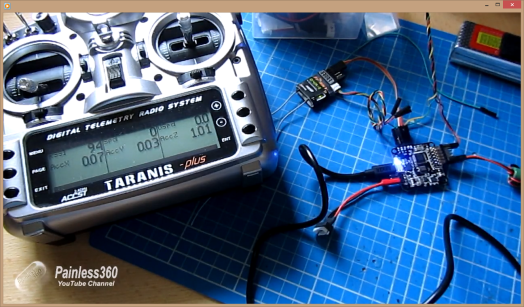
Many of the newer boards are now starting to support FrSky telemetry natively so you can connect  your receiver up to telemetry port on the flight controller and receive key flight data (GPS position, altitude, speed, battery voltage, accelerometer reading etc.) directly on the screen of your radio. This is great feature.
Be aware though that due to the inverted nature of the telemetry signals for FrSky receiver an inverter may be needed.
To see FrSky telemetry being sent using only a servo cable to a OpenTX powered Taranis Radio from a Naze32 visit: Taranis and Naze32: Setting Up Telemetry (http://bit.ly/1GnLiZU)
Using Special Functions and Logical Switches
to Automate Events
With the ability to read the status of key elements like flight battery we can also setup logical switches and special events to automate some of the events on the multirotor.
A useful addition could be setting of a low voltage alarm to trigger some LED lights on the craft to come on or even activate the GPS RTH flight mode so that the craft automatically came back to you when the battery reached a pre-defined level.
Using the Radio to Tune the Model
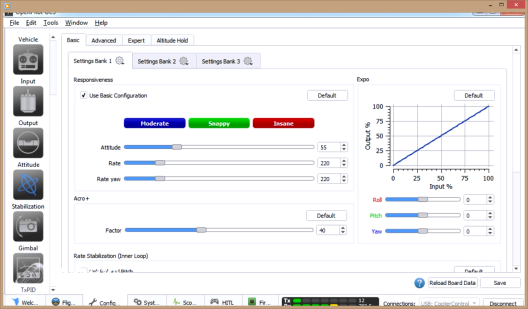
Tuning a Multirotor can be a very iterative process. The loops used to stabilise the mode  include Proportional, Integral and Derivative controls and settings, commonly known as PID. Each setting needs to be tweaked slightly and then tested using another short flight with the model. This can be time consuming but will produce a more satisfying flying experience once complete.
Some more advanced software allows for an ‘auto-tune’ feature that will fly the model and try different combinations of PID until it gets the best fit. Not all flight controllers have this ability and an auto-tune will never match the precision of a well done manual tuning.
Many flight controllers allow you to manually tune the model in flight by using a slider to directly affect the value of one of the three stabilisation functions (P, I or D) to dramatically speed up the manual tuning process. Using the sliders can be a great way to help tweak the setting on your craft.
If you want to know more about PIDs then you can watch: Multicopter Tuning: Theory and Practices (http://bit.ly/1dZw7eY)
Setting up the Failsafe
Finally, one of the most important things to setup on the radio is the failsafe on the receiver. Remember you are not flying the craft; you are letting the flight controller know what you want to do next. Because of this, the flight controller operating in the more autonomous flight modes can be capable of flying the craft without your input!
Making sure that the failsafe is setup and tested is essential to avoid a ‘flyaway’. Don’t wait until the test flight is finished to set it up. Do before you leave the bench to go to the field.
You can set the failsafe to reduce the throttle for a controlled decent on the more basic flight controllers and initiate the GPS RTH feature on the more advanced boards.
If you would like to know more about how to avoid ‘flyaways’ then you can watch: Avoiding Flyaways (http://bit.ly/1KSyGJV)

