Using Zadig, or, Avoiding Zadig Hell
NOTE 1:
At this time, a working STM 32 Bootloader driver is the only way Windows computers will update OpenTX to v2.x and above the first time from either an earlier version of OpenTX [pre-V2.0)or another firmware package such as FrSky's OEM version. Another way is by using progrmmer's trick called a shell, but that’s something that’s beyond most of us. The newer Taranis Plus radios ship with FrSky's proprietary version of OpenTX v2.+ that has a bootloader installed. If you have one of these transmitters, it is not necessary to have Zadig installed to update the firmware only. However, I still recommend that you install it, as updating the radio through Companion with the TX off is considered the preferred method for upgrading as it ensures that both the firmware and the bootloader are updated.
NOTE2:
TX is sometimes used as a shorthand form of 'transmitter.'
NOTE 3: Click HERE for a copy of the Using Zadig Notes and Checklist PDF!
Background
Windows will not automatically install the driver we wish to use with OpenTX Companion the first time you connect your transmitter to your computer. You’ll need to download and run a little program called Zadig to get the correct driver and register it in the Windows registry.
If you’ve been using Companion 9X to update your firmware (not just work with the EEPROM, but update the firmware), you’ve already got a working bootloader. However, from time to time, Windows seems to exhibit a mind of its own, and the bootloader won’t install when you plug in your transmitter. If that happens, you need to re-run Zadig.
Using Zadig Checklist
Step #1: Do You Already Have A Working STM32 Bootloader?
This section will walk you through how to check to see if you have a working copy of STM 32 BOOTLOADER already installed on your computer.
- Turn on your computer.
- Watch Scott’s video: Upgrading to v2.0.
- With the TX OFF, plug a USB cable into an available USB slot on your computer. If you have both USB2 and USB3 ports available, the safest thing to do probably is to try the USB2 port first. The latest version of Zadig is supposed to take care of that little “undocumented feature” in Windows, but it never hurts to maximize your chances of success. Wait a few seconds to give your machine time to recognize the new device.
- Open the Control Panel
- If you’re using Windows 8+ with the “new” desktop:
- Open Control Panel by swiping in from the right edge of the screen
- Tap Search (or if you’re using a mouse, point to the upper-right corner of the screen, moving the mouse pointer down, and then click Search)
- Enter Control Panel in the search box
- Click Control Panel to open it
- “Classic Desktop” Users (Either pre-Windows 8 or those using a classic desktop emulator):
- Click: “Start Button”
- Click: “Control Panel” to open it
- If you’re using Windows 8+ with the “new” desktop:
- Access the Device Manager
- In the Control Panel, click “Hardware and Sound” to open it.

- Under “Devices and Printers, click “Device Manager” to open it.

- In the Control Panel, click “Hardware and Sound” to open it.
- Scroll down the list to the bottom.
- Check to see if the last entry is either “STM 32 BOOTLOADER” or “USB Serial Bus Devices” (NOT “USB Serial Bus Controllers). If “USB Serial Bus Devices” is present, but you don’t see the bootloader, you may have to click the arrow next to the devices fork to open it.
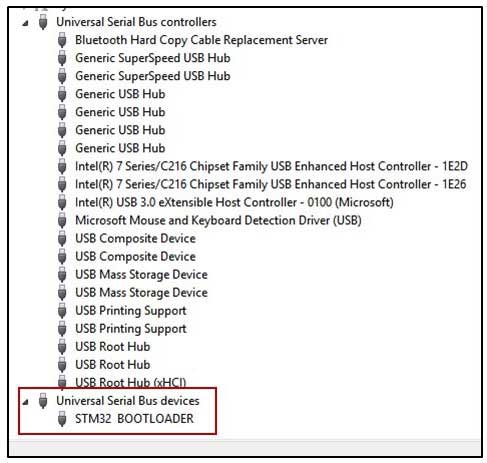
- If you see the image above after you’ve opened the listing fork, CONGRATULATIONS! You already have the correct driver and you’re ready to download and install OpenTX Companion and OpenTX. If you don’t see the image above showing the BOOTLOADER, proceed to the next Section to download Zadig and install the driver.
Step #2: Downloading Zadig and Installing the Driver
In this section, you’ll download the latest version of Zadig and run it to install and register the driver that we need to run OpenTX Companion on a Windows computer. It isn’t really rocket science, although there are a couple of things you have to do to make things work right. Don’t worry! We’ll walk you through them.
- First, you need to get the driver. Go to the Zadig Home Page at: http://zadig.akeo.ie/ This page can sometimes be a bit confusing. See the image below for the download section.
- Choose the correct version Zadig that matches your Windows version. For most of us, that will be the “Zadig for Windows Vista or Later.”

- Click the link to begin the download. You’ll be prompted to save the file. Select: Save File. REMEMBER WHERE YOU PUT IT!
- The name of the file you’re downloading will be something similar to: Zadig_2.1.0.exe. Note that the version number may change as newer versions are released.

- Once the download is complete, navigate to where you saved the file.
- Double-click the file to begin the driver installation. Windows may ask for permission to allow the file to change your computer. If it does, allow the change.
- The first screen you see will be the Zadig install window. You’ll do all your work from here.

- The next step is to tell Zadig what to do.
- In the Zadig menu bar, select Options.
- From the choices, select “List All Devices.”
- Click the down arrow in the selection box just under the Zadig menu bar, and scroll down until you see “STM32 BOOTLOADER” and select it. Leave all other settings as they are.

- Click the large button labeled either “Install Driver” or “Reinstall Driver.” Reinstall Driver shows if, as I have, you already have the STM32 device driver installed and you’re simply updating the driver.When the install completes (just a few seconds in most cases), you’ll be presented with the following image:

JOY, OH JOY!!
You’ve successfully installed the driver needed to run OpenTX Companion and flash the OpenTX firmware! Or, have you?
- Return to Step #1 and check to see if you can see the STM32 BOOTLOADER listed in the USB Serial Device fork of the Device Manager.
- If not, try the following:
- Try a different USB port. Zadig v2.1.0 is supposed to have fixed the bug of not communicating with USB3 ports that was evident in some chipsets. In any case, if you’ve followed Step #1 exactly and don’t see the driver, try a different port.
- Make sure that the Taranis is OFF when you plug it into the USB port!
- If you can see the Universal Serial Bus devices fork (NOT Universal Serial Bus controllers), it may be collapsed. Click the arrow on the left side of the listing to expand the fork.
- Try unplugging the radio, then shutting down and rebooting your computer from a cold start. Check the Device Manager.
- If nothing shows yet, re-run Zadig.
Finally, if that doesn’t do the trick, you can try the: FrSky Taranis with Open TX 2.0 and Beyond forum on RC Groups. There are a whole passel of talented folks who hang out there reading and willing to help. Post your question, describing your problem(s) and what you’ve done as succinctly as possible, and chances are you’ll have an answer in a very short time.
Another good forum to try would be the original Taranis forum started by Wayne at Aloft Hobbies: FrSky Taranis-16 Channels, Full Telemetry, RSSI . This is an extremely active forum with, literally, thousands of posters. However, I would not post the same question in both forums at the same time. That’s called cross-posting, and it’s severely frowned upon by the user community. Post in one or the other, give it a couple of days, and if you don’t get any help, post in the other list with the disclaimer, “I apologize for cross-posting this, but I didn’t get any response in the other thread. I’ve been…..” There are, of course, numerous other OpenTX and Taranis related threads out there on a number of forum sites. It’s worth your while to dig around a bit and give some of them a peek.
Well, you’re ready. You’ve gotten the correct driver installed, and now it’s on to downloading and installing OpenTX Companion and flashing the OpenTX firmware to your Taranis. It’s OK to feel proud of yourself. This step probably gave more trouble to more new users that anything about OpenTX. With any luck, you won’t find anything down the line that’s as complicated or difficult.