Create Your Own Custom Model Image in Taranis
Your tour guide: Bob Russell (modbuilder on RC Groups)
This is a short-course with step-wise instructions to get your own custom model image displayed on your Taranis screen for the model you choose. The instructions are based on a Windows computer. Mac users will be able to make appropriate adjustments for commands.
The order of doing these steps was found to be important to the success of the procedure. The original instruction worked for some users and not for others. This revision resizes the image prior to converting it to grayscale and hopefully will allow everyone to be successful. The problems were reported in the comments to the original instruction, and those comments have been removed with this 3/30/15 revision to avoid confusion. Please continue to use the comment form at the end to feedback your results in creating your own model image. Thanks akujiwar, dlondon, and richrfl for recognizing the problem and helping work through it. …… Bob R.
Assumptions:
- You have a way to take a digital picture and get it into your computer – digital camera, camera phone/tablet, scanner, etc.
- You can save/copy/move files among folders in your computer
- You are familiar with button navigation on your Taranis
- You can download and install programs from the internet onto your computer.
- You have a computer with a USB port
We begin:
1. Model images displayed on the Taranis screen must meet a standard format:
-
Size: 64 pixels wide by 32 pixels high
-
Color: grayscale
-
Color Depth: 4 bits/pixel (16 colors)
-
File Name: up to 10 characters max. No embedded blanks.
-
File Type: bit-mapped image (BMP file suffix)
Here’s an original photo before I modified it to meet the image specs and placed it in the Taranis. The photo is a discontinued Hanger 9 Katana 50 taken with an iPhone 5 after the maiden flight at the local field. I emailed the photo to myself, then saved the picture to a folder on the laptop used for email.
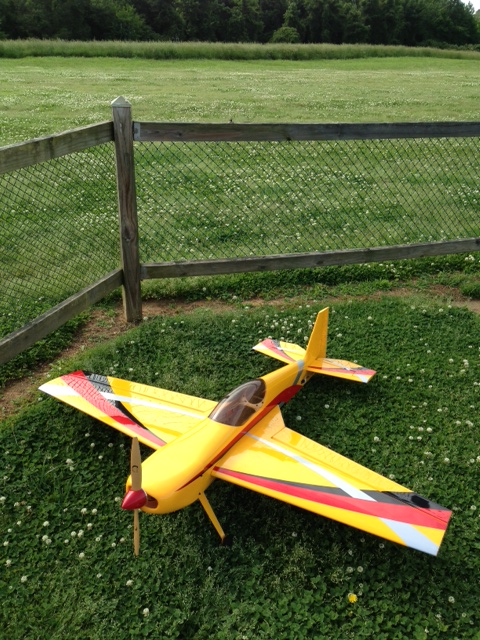
After we cropped the image of the plane, resized it to 64 x 32 pixels, and converted it to grayscale, this is the image that now displays on the Taranis screen:![]()
2. Obviously we need photo editing software. Adobe Photoshop is the industry juggernaut software application, but it’s costly and has a steep learning curve. Microsoft Paint is included with all Windows operating systems, but I haven’t been able to make Paint do this editing job. There are several freeware applications that will work fine. I used IrfanView on a Win8 laptop, and the rest of this instruction is based on IrfanView (ver 4.38) photo editing software. You can download/install a free copy from here if you want to follow along: http://www.irfanview.com/
3. Launch Irfanview and load a copy of the target photo.
- [from IrfanView toolbar] File –> Open. Mine automatically opened to the photos in my Pictures folder. If needed, use the “Look In” window to navigate to the folder holding your target picture. Select the desired picture and click “Open” on the IrfanView screen. Your picture opens in the IrfanView work area.
4. Crop the picture to capture only the part to be used. As you can see, a 64×32 pixel image is not a lot of viewing area
- Left-Click and drag with your mouse on the image to outline the active picture area to keep
- [from IrfanView toolbar] Edit –> Crop Selection (Cut Out)
Your work area now contains only the cropped image
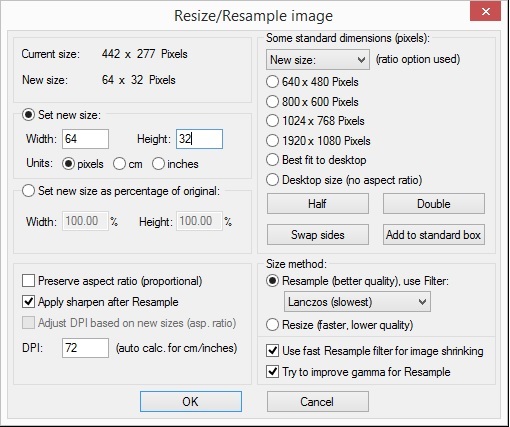
5. Adjust the image size to 64px wide x 32px tall
- [from IrfanView toolbar] Image –> Resize/Resample
- “Set new Size” to 64 width and 32 height
- “Units” = pixels
- Apply other fine-tune settings as shown below and click “OK”
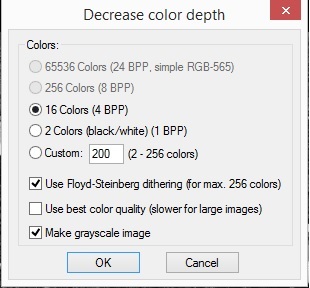
6. Convert the image color to grayscale with 4 bit/pixel color depth
- [from IrfanView toolbar] Image –> Decrease Color Depth
- Select “16 colors (4BPP)”
- Accept “Use Floyd-Steinberg dithering…”
- Select “Make grayscale image” and click “OK”
7. Save the image to your computer as a bit mapped file with .BMP suffix
- [from IrfanView toolbar] File –> Save As
- The default folder should be the same as you started. Change if desired.
- Create a new file name with max 10 characters and no blanks
- Select “BMP – Windows Bitmap” for your ‘Save As Type’
- Click ‘Save’
8. Transfer your new image file to the BMP folder on the SD card in your Taranis
- Launch your Computer Files browser and open the Pictures folder you use
- Start Taranis in bootloader mode (rudder & ail trimmers to center while turning ON)
- Connect PC and Taranis via USB cable
- [Computer now sees two Taranis external drives — Taranis_SD and Taranis]
- LEAVE THE “TARANIS” DRIVE ALONE — that has your firmware
- Expand the “Taranis_SD” drive,
- you should see a “BMP” folder that contains your image files
- If you don’t see a BMP folder, back up; you’re in the wrong drive!
- Copy your newly created 64×32 grayscale image to the BMP folder from where you saved it
- If you already have a file by that name in the BMP folder, you’ll have to rename one of them or replace the prior one with the new one.
- Use the “Safely Remove Hardware” icon in the notification area at the far right of the Windows taskbar to insure the Taranis drives are closed before disconnecting them from the computer. Failure to do this could corrupt the SD card. Disconnect the USB cable.
9. Assign your new image to the model that you want.
- Exit the Taranis bootloader mode, or restart your Taranis normally, clear the startup warnings
- Select the model to which you want the new image assigned
- Short-Press PAGE into the MODEL SETUP screen
- Navigate down to the Model Image field. Short press ENT. A selection list drops down. Navigate to the image name you created.
- Short Press ENT to select your new image. Exit to finish.
CONGRATULATIONS! You now have your very own image showing on the assigned model and can convert/assign as many photos as you have models. If your new model image does not show up on your Taranis screen when you call that model, then you probably missed one of the steps that achieves the required specifications, e.g., color depth, size, name convention, etc. Go back into the properties of your new image and compare to the specs list at the top of this class.
Hope this helps. Have fun…………… R
Fly Often. Share the Joy. Be Safe.